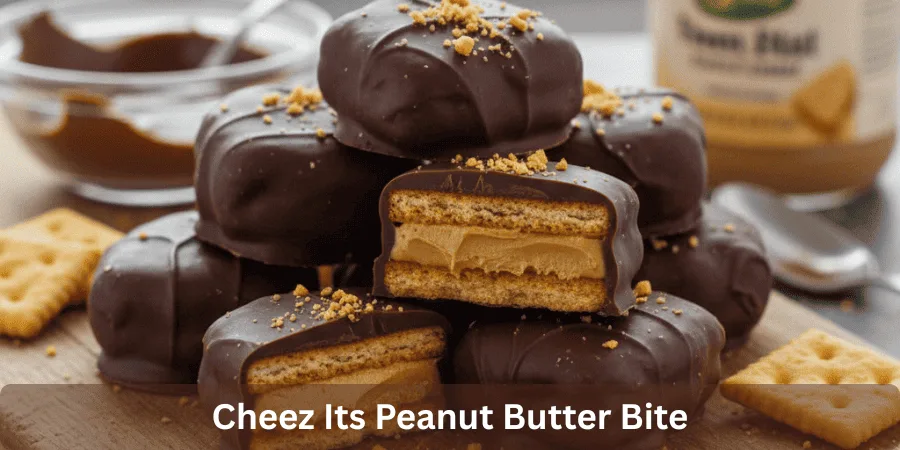
From my own kitchen trials, I’ve learned this easy idea shines when kept simple: Cheez-It’s crackers are made from bold flavor, and when 2 are sandwiched between peanut butter, it actually feels like a homemade win; these bites feel perfect because they are filled with a sweet and salty balance.
Then dipped in chocolate and lightly topped with sprinkles, they become Bites that are crunchy, delicious, and a real treat that totally hit the spot, with a taste like Butterfinger, and every time I make them, I’m reminded which flavors work best, because These snacks are simple and hard to stop eating.
Cheez Its Peanut Butter Bite-The Short Answer
Why This Is My Go-To Treat
- When I feel lazy, I can make this at home with only a few ingredients, skipping the grocery store completely.
- It gives me that candy satisfaction I love, tasting like my favorite Butterfinger bar in easy, crunchy bites.
- From personal experience, an endless supply always feels ready and awaits me, which beats running to the store every time a craving hits.
Ingredients (What Really Matters)
- This no bake recipe is built on simplicity, which makes it quick to put together when you want something easy. I usually use Cheez-It’s crackers from a 12 oz box—the classic, original, or regular variety works too.
- The salty crackers pair well with ¼ cup peanut butter; I prefer creamy, but crunchy is fine.
- For the coating, 8 ounces chocolate chips—semi-sweet, semisweet, or milk chocolate—melt best with 1 tsp coconut oil or a little vegetable oil to stay extra smooth and keep the flavor balanced.
- For parties, movie nights, or homemade gifts, I scale up to 72 or 96 crackers and add a couple teaspoons more oil for easy dipping.
- I’ve made this often enough to feel comfortable adjusting by the cup or tbsp; it doesn’t need precision. You probably already have all the ingredients on hand anyway, which is why I come back to this recipe again, sometimes finished with red and green nonpareil sprinkles because I like it that way.
Tools I Trust in My Kitchen
- Place a silicone baking mat on a baking sheet to prevent sticking and mess.
- Use mixing bowls to combine peanut butter and chocolate smoothly.
- Keep a rubber spatula handy for gentle, even coating.
Instructions
Why This Combo Works
- I know it sounds unusual—I thought the same when I initially tried it.
- The taste quickly changed my mind.
- Cheez-Its bring a mild cheese flavor that balances chocolate, creating a salty sweet chocolate combo that feels worth it every time.
- These snacks are something I make all year, and they truly disappear suddenly once people start enjoying them.
Build the Cracker Base
- Arrange and lay out half of the crackers on a baking sheet that’s lined with parchment paper, silicone, or wax paper.
- On each cracker, add peanut butter in the center:
- 1 tsp for balance
- ¼ tsp for a thinner layer
- 1 teaspoon for a fuller bite
- I pipe it using a piping bag or frosting bag, cut off with a small tip for better control, so nothing squeeze outside and there’s less to clean off edges.
Chill for Stability
- Top with another or second cracker, using the other half of the remaining crackers to make, creating a neat sandwich.
- Use a lightly gentle press to fill out the cracker—don’t press down too hard.
- Place the tray in the freezer or fridge for 15 mins, few minutes, or up to 30 minutes so the filling can firm up and won’t slide.
Melt the Chocolate
- Combine 8 ounces of chocolate chips with vegetable oil or coconut oil in a microwave safe bowl.
- I’ve also used milk chocolate chips, melting chocolate wafers, and fresh chocolate with great results.
- Melt in the microwave, keeping it microwaved in 15 second intervals until smooth, finishing with a stir around 60 seconds or 60-75 seconds for a dippable consistency.
- A double boiler works too if you prefer more patience.
Dip, Set, and Serve
- Dip each cracker sandwich halfway, working one at a time.
- Use a fork or chocolate dipping tool to coat, lift out, and tap against the side or edge of the bowl so excess chocolate can drip off.
- Place back on the sheet, repeat, and sprinkle sprinkles or holiday nonpareils for extra pizazz if desired.
- Let them set in the fridge or refrigerate for 2 hours until ready to serve.
What You Get
- Finished bites feel like miniature candy bars—sweet, savory, crispy, and creamy with a subtle cheesy note.
- They remind people of Butterfinger, taste like heaven, and are ridiculously delicious.
- Store in an airtight container and they’ll stay fresh for up to 2 weeks—but honestly, stay tuned, they rarely last that long.
Quick Pro Tips I Actually Use
Choosing the Right Base
- For CHEEZ-IT VARIETY, I like using big Cheez-It’s for this because they can hold a little more peanut butter and are easier to handle, since they aren’t as small, but feel free use original too.
- You’ll just less stuff each one, which still works well in practice.
- For PEANUT BUTTER, I recommend creamy Jiff or Skippy because they’re thick and sticky enough to keep the Cheez-It sandwich together when pressed together.
- Some of natural varieties are too runny and will pour out sides Cheez-Its, something I’ve personally run into before.
Chocolate That Works Every Time
- MICROWAVING THE CHOCOLATE is important: I always microwave chocolate in 30 second intervals, stirring between to prevent burning.
- It should only take about 1 minute to fully melt and be ready dipping.
- WHY I ADD VEGETABLE OIL is simple—adding vegetable oil chips helps become super smooth and creates the perfect consistency.
- I usually dip sandwiches halfway into the chocolate so that it doesn’t overpower whole cracker, but you could also coat these completely if you’d prefer.
Setting, Storing, and Small Details
- For SETTING, I transfer them to the fridge or freezer to set; if you’re impatient me, the freezer faster, though both ways work.
- Once stored an airtight container, the snacks stay fresh up 2 weeks, with about Calories 45kcal each.
- Make sure get refined coconut oil since it has less flavor than unrefined; if you can’t have coconut, sub canola oil.
- If your chocolate is super fresh, skip oil—the goal for our chocolate is pourable.
Leftovers keep well at room temperature.
More Homemade Recipes You’ll Love
If you enjoyed this Cheez-It Peanut Butter Chocolate No-Bake Snack, you’ll also love Sweet & Gooey Graham Cracker Marshmallow Chocolate and Avalanche Cookies Made Easy (No-Bake Recipe)—both are easy, cozy treats perfect when you want something sweet with minimal effort.
For more quick dessert ideas I personally turn to, try Popcorn Cake Recipe | Super Quick & Easy No-Bake Treat, Irresistible Cinnamon Sugar Biscuit Bites: Sweet & Crispy!, and Lazy Girl’s Guide: Easy Monkey Bread in a Loaf Pan—simple recipes that always deliver big flavor without the stress.