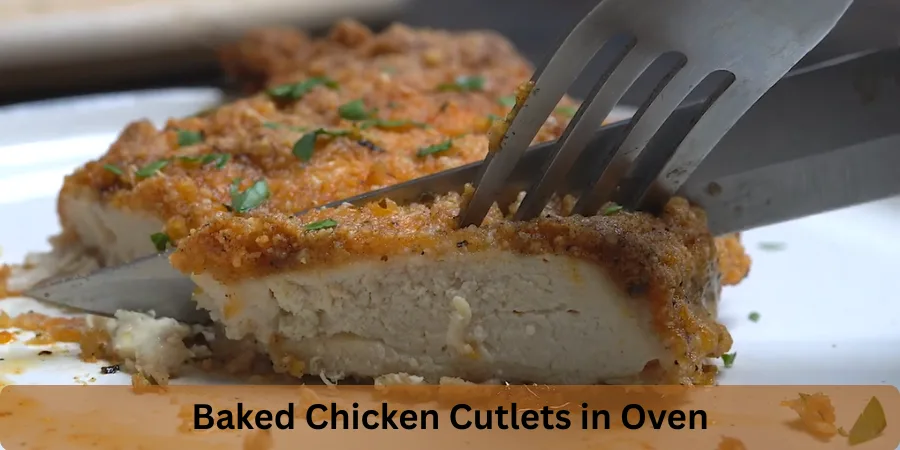
From my kitchen, these oven baked chicken cutlets turn crispy outside and juicy in the middle, yet feel easier to make than traditional fried ones. You still get a golden crunchy coating without standing over hot oil, and the recipe is ready in about 40 minutes—perfect for a weeknight dinner or easy meal prep with great flavor and no frying mess.
I prefer this Italian way because it won’t disappoint—thin breast pieces are coated in egg, pecorino, and parsley, then covered with seasoned breadcrumbs and roasted until tender inside. Few things beat biting into a cutlet like this, and the simple baking technique makes it almost like the fried version, enough to satisfy cravings.
The Short Answer
What I love most is the clean process, enticing aroma, and the fact you won’t scrub greasy splashes. With only a few key ingredients, it’s about quality and seasoning—add grated cheese, fresh herbs, and roast at high heat for the best result. My kids can’t get enough; they turn out perfect every time, tasting like restaurant-style garlic parmesan, but better at home.
Why This Recipe is a Smarter Choice
- I rely on oven baked chicken cutlets as a simple cooking method that really helps in my kitchen. The breaded coating with breadcrumb, parmesan, and lemon zest turns crisp, keeping that classic texture and rich flavor.
- A wire rack ensures both sides cook evenly and quickly when the thickness is even, with no frying, no splattering, and less oil, so cleanup stays easier and clean. I like to add extra seasoning depending on what I want to serve, making it a great recipe to customize and repeat.
- It’s a beloved comfort food that everybody loves and enjoy. I often make a big batch for meal prep and keep them in an airtight container for five days in the refrigerator or three months in the freezer.
- It fits any mood—just go for this lighter way that uses less effort but delivers much taste. Most cooks find it’s the one dish they rely on throughout the week, because it gives a real plus.
Ingredients
Preparing the Chicken
I use Chicken breasts, Boneless, skinless for easier prep. Slicing in half lengthwise with light pounding gives even thickness so they cook evenly and stay tender. Whether 3, 4, or 1.5 pounds of chicken breast, I keep a uniform thin cutlet. Pre-sliced from supermarkets is a quick option to save time.
Building the Coating
I mix Breadcrumbs—Italian, plain, or Panko bread crumbs (italian style panko)—based on my choice, then add Parmesan cheese for a savory flavor and crispy coating like a classic chicken cutlet, sometimes using Pecorino Cheese or grated Pecorino Romano cheese. When going homemade from scratch, I use Dried Herbs, Spices, dried oregano, dried basil, garlic powder, onion powder, and ground black pepper—fresh, good quality spices matter, so if they’ve sat in the cupboard for years, I replace them.
Wet Mixture and Binding
I whisk Eggs with Milk or whole milk as a binder in the breading process so breadcrumbs can hold well, adding moisture and richness. I mix in parsley, chopped flat-leaf parsley, or Fresh Chopped Parsley for extra layers in the mixture, and a quick dip in the egg mixture gives maximum breading without getting too thick, helping it stick perfectly.
Seasoning and Finish
A Pinch of salt, black pepper, Sea Salt, coarse salt, or Salt flakes lifts the taste
I add Seasonings like Garlic Powder, Smoked Paprika, and Italian seasoning, plus Lemon zest—a small ingredient that brightens and adds a fresher flavor to the cutlets
I use 1 teaspoon or 1 tablespoon (Tbsp) of seasoning to control flavor balance
For finishing, I use Olive Oil, avocado oil, or Cooking Spray like avocado cooking oil spray or olive oil spray—a light spraying keeps it healthy and crisp
I coat with 1 cup, ¾ cup, ½ cup, ¼ cup, or up to 1½ cups of Seasoned Breadcrumbs depending on how many chicken cutlets I’m making, then add garnish and adjust salt, pepper, and taste
Instructions
Preheat & Setup
Set your oven to preheat at 400°F or 425°F depending on how crisp you like it. Place a wire rack over a parchment-lined base to prevent sticking, then lightly grease, brush, or use avocado cooking oil spray. Once prepared, set aside and prep your space to gather all ingredients as per specifications—this small habit always keeps things smooth.
Breading Station
Arrange shallow dishes and use a large bowl for mixing to combine breadcrumb ingredients like breadcrumbs, seasoned, Italian, or panko bread crumbs into a breadcrumb mixture. Add all-purpose flour and make an egg mixture with eggs. This breading station, based on a classic breading procedure, can be adjusted—I sometimes omit flour for a lighter, less thick coating.
Prepare the Chicken
Place chicken breasts (preferably boneless, skinless chicken breast) on a cutting board, slice horizontally through the center into even pieces, cover with plastic wrap, and pound with a meat tenderizer, meat mallet, or rolling pin to an even thickness of 1/4 inch thickness or ½ thickness. A quick freeze for 20 minutes makes it firm and easier—a trick I still use.
Season & Marinate
- Pat dry with a paper towel, then remove and discard any fat, cutting into smaller pieces if needed
- Season both sides with salt, sea salt, black pepper, or a pinch salt (even salt flakes or coarse salt work), then add Italian seasoning and other seasonings
- Rub with olive oil so it can absorb rich flavors—this step always boosts the taste in my experience
- Add lemon zest, parmesan, grated Parmesan cheese, or Pecorino Romano cheese, plus fresh chopped parsley, garlic powder, onion powder, smoked paprika, dried oregano, and dried basil
- If you have time, let it marinate for one hour, 1-2 hours, or overnight for more tender, moist, and better taste
- You can also prep ahead and store in the refrigerator in an airtight bag or container for several hours or days
Coat & Arrange
Dip into the egg mixture, then dredge to coat the chicken so the coating sticks. Use light pressing and patting to adhere, arrange breaded cutlets in a single layer, work one-by-one with a fork, tongs, or hand, keep one side wet and the other dry, and shake off any excess breadcrumbs.
Bake to Perfection
- Lightly spray the top side so it turns brown with a nice browner crust
- Place in the preheated oven and bake for 15 minutes
- Flip and continue baking for another 5-8 minutes until golden and cooked through
- Check the internal temperature—once it reaches 165°F at the thickest part using a meat thermometer, it’s ready
- For extra crisp, use the broiler on a low setting for a minute, but watch closely so it doesn’t burn quickly
- If available, use the convection option with high heat and low rack placement
- Finish with a sprinkle, serve immediately, and pair with healthy side dishes—Buon Appetito
Pro Tips
- I always Use a simple prep: slice and pound the chicken evenly to about ½ thickness max so every cutlet can finish cooking at the same time without turning uneven. You can buy already cut breasts or prep them yourself.
- To make it easy, work in a wide, shallow vessel such as a pasta bowl or sheet, then do the breading and pat it onto each piece of meat to be sure it sticks and prevent coating from tearing.
- For baking, never go directly on a pan—a wire rack keeps the bottom from getting soggy. Grease it well, then spray or brush the tops lightly with oil—that extra step is key in contributing to a golden, crispy finish.
- Place it in the lower part of the oven, roast on high heat, and ensure it browns and crisps up properly; also, spraying parchment paper helps.
- Don’t over bake—since cutlets are thin, they can dry out quickly if left in the oven too long.
- I always make extra—you’ll be happy you did; any leftover can be held in the refrigerator for up to 5 days.
Notes & Nutrition
Smart Prep Notes
- In my kitchen, I focus on small details—Depending on how thin you slice the breast, it helps determine how many strips you get per serving
- Each one full portion, Which should be sliced into 2-3 pieces, works best when you use panko breadcrumbs and sometimes skip Italian seasoning
- Good Seasoning matters—I like to season every coating ingredient with salt and pepper so the cutlets taste better, with each layer well-seasoned
- During Baking, always make sure to grease the wire rack very well before placing the meat, so the crust doesn’t stick
- If you want extra flavor, a quick Marinade to marinate in buttermilk and spices can bring it to a whole new level
Storage, Reheat & Nutrition
- I refrigerate leftovers in an air-tight container or zip-lock bag for about 3-5 days
- To reheat, I always prefer the oven so the chicken will stay crispy—just place on a baking sheet, put at 350°F for 10-12 minutes
- If you decide on a microwave, they may come soggy
- From a Nutrition view: Calories 271kcal, Carbohydrates 30g, Protein 22g, Fat 6g, Saturated 2g, Polyunsaturated 1g, Monounsaturated, Trans, Cholesterol 97mg, Sodium 488mg, Potassium 307mg, Fiber, Sugar, plus Vitamin A 200IU, C 3mg, Calcium 151mg, Iron
FAQ’s
How to keep them crispy?
For oven, baked, chicken, cutlets, the best way to keep them crispy is using a greased wire rack instead of placing them directly on a sheet pan. This lets hot air circulate underneath, so both sides stay firmer and the coating doesn’t steam at the bottom. The breading stays crisp and not soft.
How long to bake?
To know how long to bake, set the oven to 400°F for 15 to 20 minutes. The exact time depends on how thick the chicken is after pounding. The best way to check if it’s done is with a meat thermometer when the internal temperature reaches 165°F.
Can you make ahead?
You can make them ahead of time—yes, just cook ahead and refrigerate for 3 to 5 days. When you reheat, use the best way in the oven on a wire rack so the breading stays crisp instead of soft.
Best way to reheat?
The best way to reheat is in the oven at 350°F for 10 to 12 minutes, preferably on a baking sheet fitted with a wire rack. This helps bring back crisp texture, much better than a microwave.
Can you freeze them?
You can freeze them—yes, let them cool completely, then freeze in a well wrapped container or freezer bag. Later, reheat from thawed in the oven so the coating stays crisp.
Panko or breadcrumbs difference?
Using panko instead of breadcrumbs in a chicken cutlets recipe is fine—yes, but the difference is the result is a bit different. Panko is made from crustless white bread, processed into flakes, then dried, giving a dryer, flakier consistency. It makes a lighter, crunchier fried food result. Regular breadcrumbs are processed into a finer crumb, not as dry or flaky as panko. You can substitute with a 1:1 substitution, which usually does the trick.
Why no salt in coating?
Adding salt to an egg or breadcrumbs mixture in frying a type of cutlet often ends with it sinking to the bottom of the mixture. It never makes it onto eggplant, chicken, or veal, so I don’t add it at the beginning of the cooking process. Rather, I salt cutlets lightly once they come from the frying pan—much better.
Can you fry instead of bake?
You can fry chicken cutlets instead of baking—yes, in a skillet with hot oil until golden brown on one side, then turn to the other side. You need to work in batches and may need to add additional oil during the frying process. The cutlets are done when they’ve reached an internal temperature of 165°F at the thickest part. Once browned and finished, transfer fried chicken cutlets to a rack placed over a sheet pan to help maintain crispiness rather than placing on a paper towel.