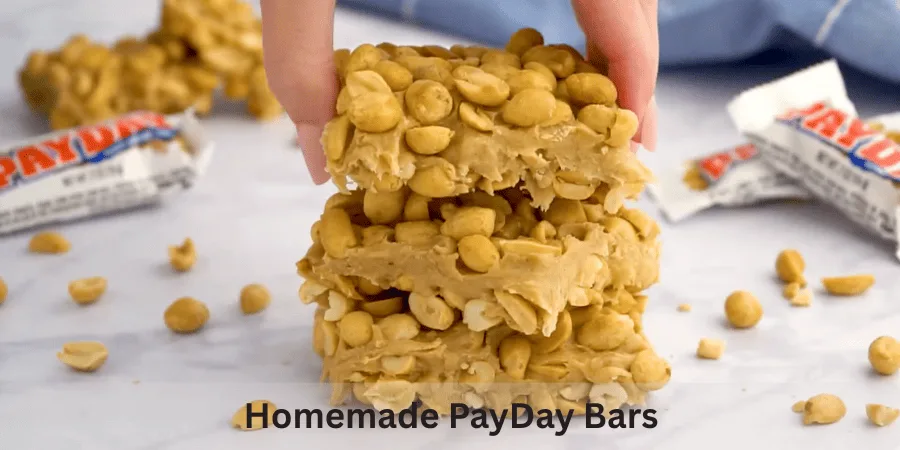
I always begin with payday bites because from my own experience one bite helps you see why they are an all-time favorite, surprisingly easy to make, and feel just like PayDay® at home.
These Delicious, Homemade, PayDay, Candy, Bars deliver the real thing with a SO balanced sweet and salty blend, where salty and sweet are perfectly mixed into a heavenly taste, texture, and flavor.
Homemade PayDay Bars-The Short Answer
Each candy bar feels Sinfully rich, fudgy, chewy, and indulgent, making it a perfect dessert, snack, or simple treat I enjoy sharing.
After testing many versions, I trust this copycat no-bake easy recipe with No baking, oven needed, proving homemade payday bars can be effortless Bars.
Why This Recipe Is a Must-Try
Contrary to popular opinion, PayDays are actually one of my favorite candy bars. I know it’s not super common when compared to Snickers, Kit, and Kat, but I just love the combination of salty and sweet.
Although it’s quick and convenient to pick up a bar at the grocery checkout line, sometimes homemade versions are better. I’ve learned there’s something special about making them from scratch, without any extra ingredients or manufactured products.
Good news, this version is honestly so simple and totally worth the little bit of effort for the fresh taste.
From my own experience, making treats at home can feel intimidating, but this recipe is great for beginners. With only 5 ingredients and 10 minutes of prep time, it makes these perfect for parties, game day, gatherings, and the holiday season.
Ingredients
- From my own kitchen experience, I know making homemade payday bars at home is super easy when everything is prepared before you make the mixture.
- I combine salted, roasted, and dry-roasted peanuts with peanut butter chips from a package, then add mini and miniature marshmallows and sweetened condensed milk from a can to build the base flavor and structure.
- I measure the ingredients in a specific way: 3 cups of peanuts, 2 cups of marshmallows, and 3/4 cup for smaller portions when needed. For fats, I use 1, 2, or 3 tbsp or tablespoons of butter. I also choose ingredient packages by their labeled sizes, such as a 10 oz or 12 oz package, and a 14 oz or 16 oz can or jar, because these exact amounts directly affect the final texture and sweetness.
- A light layer of cooking spray prevents sticking, and I appreciate that there is no boiling, no thermometers, and no baking required, which keeps the process stress-free.
- The finished mixture forms soft bites that clearly resemble real candy bars, delivering a sweet and salty taste that is just like the real thing, and sometimes even better.
- The classic, creamy texture comes from the perfect balance of ingredients and smooth sweetness, making this the best copycat version I’ve tried, and when stored in a jar or bag, sometimes divided, I’m confident you’re going to love them too.
Practical Instructions You Can Trust
When Making Homemade Payday Bars, clear Instructions and smart Directions matter. How to make the best homemade payday bites starts with preparation and flow, not rushing.
- Begin with PEANUTS and peanuts measured as half 1/2, then pour into a greased 11×7 pan or 9×13-inch baking dish that has been spray coated and prepared for cooking.
- Spread them to cover the bottom, forming a sturdy base that is technically not nougat, yet delivers a rich, creamy, chewy candy center with added crunch, making every little bite irresistible.
- For the FILLING, use a small saucepan on medium heat to combine peanut butter, chips, mini marshmallows, sweetened condensed milk, and butter.
- Let everything melt, then add steady motion to stir until completely melted, smooth, combined, and evenly mixed into a glossy mixture in about 5 minutes.
- This can be evenly divided into a muffin tin with cups, giving each one the same amount.
- Finish with the TOPPING, placing the remaining nuts on top, then transfer to the freezer or refrigerate until fully set for at least 2 hours, until properly chilled as desired.
- Allow it to cool, then cut into bars and pause before enjoying them, a step I always respect whenever I cook this treat at home.
Notes & Texture Choices
- Peanuts matter first because texture defines the bite; using roasted peanuts in a payday candy bar adds more crunch and a little bit of deeper flavor I always look for.
- Pan Size affects results; a 9×13 pan gives bars that are thinner, helping them need less time to cool and solidify, which is practical when working at home.
Melting and Mixing
- The Microwave Melting Method works best with a microwave safe bowl to warm butter and peanut chips gently.
- Heat in 30 second intervals, take the bowl out, stir, and make sure nothing is sticking or burning, since slow control matters.
- When successfully melted, mix in sweetened condensed milk and marshmallows to form a smooth base.
Shaping the Bars
- A SILICONE MUFFIN TIN or silicone mini muffin tray helps Payday bites easily pop from the cups without liners or greasing, saving time and cleanup.
- While MAKING the CANDY BASE, it takes only minutes to prepare on the stove, but I avoid cranking the heat for speed because sugar can burn and end up ruining the mixture.
Working Quickly
- WORKING QUICKLY is essential since the mixture starts to set fast.
- I move quickly when scooping, and if it begins thickening, I return it to the heat and reheat until it becomes scoopable again.
Topping and Finish
- TOPPING WITH salted peanuts helps offset the sweetness naturally.
- Pressing them into the surface of each piece is important; peanuts that aren’t pressed won’t stick properly, keeping the final texture chewy instead of messy.
Storing and Sharing
- I STORE paydays in an air-tight, sealed container placed in a dry place.
- A fridge, outside, or kitchen counter is fine; you can keep them up to a week before they get hard and inedible.
- Typically, you shouldn’t FREEZE caramel based bars because they become rock solid, don’t defrost well, so I recommend avoiding freezing, even though some bites require chilling.
- When I Wrap to share, Delivering homemade candies can be tricky if the wrap doesn’t stick.
- Wrapping with parchment paper and other wrappings allow them to look nice and stay clean, a quick and convenient alternative to a pick from the grocery checkout or local convenience store, especially when making a bulk amount.
Nutrition Snapshot
- One Serving (16g) may include Calories 391kcal, Carbohydrates 35g, Protein 14g, Fat 24g, Saturated 10g, Trans 1g, Cholesterol 18mg, Sodium 216mg, Potassium 305mg, Fiber 3g, Sugar 26g, Vitamin A 132IU, C 1mg, Calcium 98mg, and Iron 1mg.
- Nutrition information is automatically calculated and used as an approximation.
- If currently following a medically restrictive plan, consult a doctor or registered dietitian before preparing this recipe for personal consumption.
My Best Homemade Recipes You’ll Love
If you love sweet, indulgent treats like Homemade Payday Bars (Quick Easy & Better Than Store-Bought), you’ll definitely want to explore more dessert favorites on our site. Chocolate lovers can’t miss the rich and decadent Fudgy Brownie Cake Mix Recipe, while fruit-based dessert fans will fall head over heels for the Ultra-Gooey Peach Cobbler Cinnamon Rolls Recipe, which delivers comfort and flavor in every bite.
For special occasions or crowd-pleasing desserts, we’ve got you covered with classics and fun twists alike. The Perfect Pecan Pie Upside Down Cake at Home is a show-stopping dessert that’s easier than it looks, and Deviled Strawberries (Easy, Fun & Crowd-Pleasing!) are ideal for parties and holidays. If you’re curious about store-bought desserts too, don’t miss our honest Costco Kirkland Signature Tuxedo Cake Review before your next grocery run.