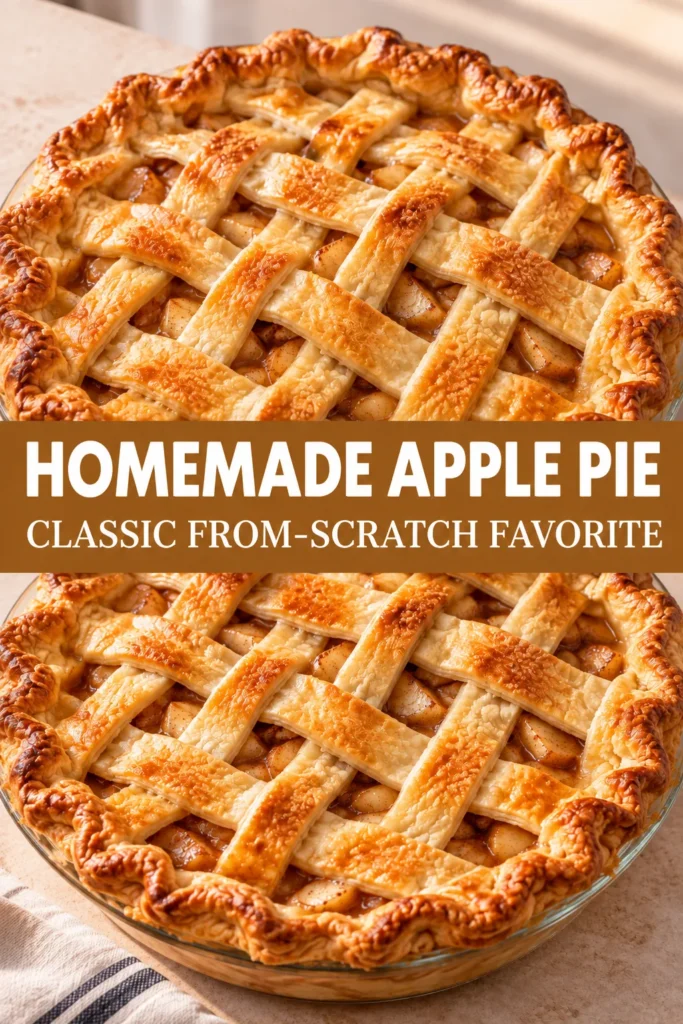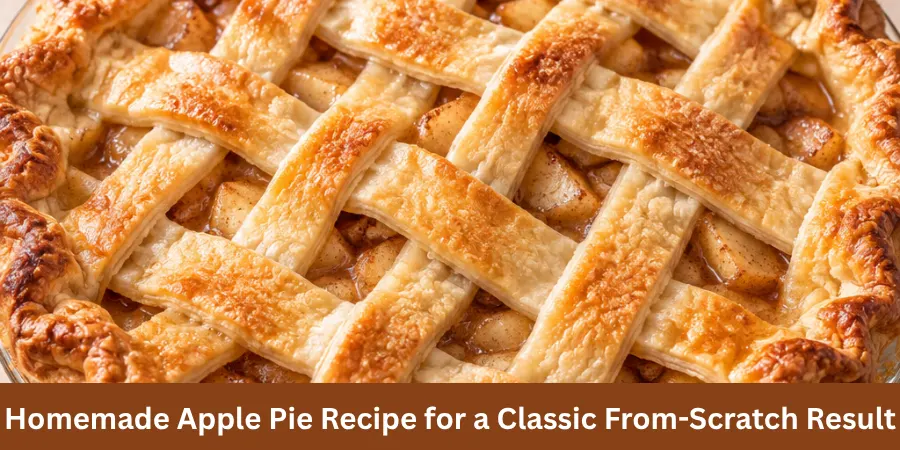
This easy apple pie recipe gives you a classic homemade dessert with a buttery flaky crust and a warm cinnamon apple filling. The combination of firm baking apples, balanced spices, and a sturdy double pie crust creates a traditional pie while keeping the preparation practical.
A short pre-cooking step helps the apples soften slightly and allows the spices and juices to combine before the pie goes into the oven. Making apple pie from scratch does not have to feel complicated.
Homemade Apple Pie Recipe-The Short Answer
A homemade pie crust creates the best flaky texture. The filling is thickened so the apple juices come together properly, and allowing the baked pie to cool fully helps create cleaner slices.
The type of apples you use makes a noticeable difference in the final flavor and texture. Firm apples help maintain their shape during baking instead of becoming overly soft. A combination of tart and sweet varieties creates a more balanced filling with deeper apple flavor.
This recipe uses a blend of Granny Smith, Honeycrisp, and Golden Delicious apples. Granny Smith apples add tartness, while Honeycrisp and Golden Delicious contribute sweetness and additional apple flavor. Together, they create a filling that is flavorful, balanced, and able to hold its structure after baking.
The apple filling is gently cooked for about 5 minutes before assembly. This short cooking step gives the apples a head start without making them soft or mushy. After cooling, the filling is placed into the prepared crust where the apples continue cooking as the pie bakes.
For the best results, allow the finished pie to cool for at least 3 hours before slicing. This resting time helps the filling set properly so the slices hold together better. Serve a slice slightly warm or at room temperature with vanilla ice cream for a classic dessert combination.
Why You’ll Love This Apple Pie
This classic apple pie delivers the familiar flavors of a homemade dessert without requiring complicated techniques.
The flaky double crust creates a crisp contrast with the tender apple filling, while the warm spices complement the fruit without overpowering it. The filling is designed to have the right balance of sweetness, thickness, and apple flavor.
Using the correct apple blend, sugar amount, and flour helps prevent the filling from becoming too watery, dry, or overly thick.
The deep-dish style allows plenty of room for the apple filling. A 9-inch pie dish that is 1½–2 inches deep provides enough space for the apples while allowing the crust to bake properly.
The goal is a flaky crust with tender spiced apples. The short pre-cooking step makes this apple pie method reliable. The apples soften slightly before baking, while the oven finishes cooking the filling and creates the final caramelized flavor.
About Apple Pie
Apple pie is a classic American dessert with European origins that has become a familiar part of holidays and family gatherings. It is often served warm with vanilla ice cream, while variations such as Dutch apple pie offer another style of enjoying the dessert.
This recipe keeps the traditional character of apple pie while making the process simple enough for a dependable homemade result. The buttery crust surrounds fresh apples mixed with warm spices, creating a filling that becomes tender and flavorful during baking.
The apple mixture is gently pre-cooked rather than fully cooked before assembly. This allows the apples to soften slightly while keeping their structure for the oven.
The cooled filling is placed into the bottom crust, topped with the second crust, and baked until the crust becomes golden and the apples finish cooking. After baking, the pie needs time to cool so the filling can properly set.
The finished dessert has a flaky crust, tender apples, warm spice flavor, and natural sweetness that pairs well with vanilla ice cream.
Ingredients Needed
- 10 cups (1250g) firm apples in total, peeled, cored, and sliced ¼-inch thick, made up of:
- 625g Granny Smith apples
- 315g Honeycrisp apples
- 310g Golden Delicious apples
- ½ cup (100g) granulated sugar
- ¼ cup (31g) all-purpose flour
- 1 tablespoon (15ml) fresh lemon juice
- 1½ teaspoons ground cinnamon
- ¼ teaspoon ground allspice
- ¼ teaspoon ground nutmeg
- ¼ teaspoon fine salt
- 1 teaspoon (5ml) pure vanilla extract
- 1½ tablespoons (21g) butter, cut into small pieces
- 2 homemade pie crusts, one for the bottom crust and one for the top crust
- 1 large egg
- 1 tablespoon (15ml) milk
- 1 tablespoon (12g) coarse sugar, optional
Pie Crust Ingredients
Makes 2 crusts:
- 2½ cups (312g) all-purpose flour
- 1 tablespoon (12g) granulated sugar
- 1 teaspoon (6g) fine salt
- 1 cup (227g, 2 sticks) cold unsalted butter, cut into ½-inch cubes
- 6–8 tablespoons (90–120ml) ice water, measured without the ice
Ingredients Notes
Apples
Apples are the main ingredient in this pie, so choosing the right varieties affects both flavor and texture.
Use 10 cups (1250g) of firm apples that are peeled, cored, and sliced into ¼-inch pieces.
This recipe uses:
- 625g Granny Smith apples
- 315g Honeycrisp apples
- 310g Golden Delicious apples
The combination creates a balance of tartness, sweetness, and layered apple flavor.
Granny Smith apples provide a tart flavor and help balance the sweetness of the filling. Honeycrisp apples add sweetness and a different apple texture.
Golden Delicious apples contribute natural sweetness and apple flavor while making up about a quarter of the blend to help maintain the filling structure.
Granulated Sugar
Use ½ cup (100g) granulated sugar. The sugar enhances the natural sweetness of the apples while helping create the familiar dessert flavor of a classic apple pie.
All-Purpose Flour
Use ¼ cup (31g) all-purpose flour. The flour thickens the juices released from the apples during cooking and baking. This helps create a filling that is juicy but not overly runny.
Fresh Lemon Juice
Use 1 tablespoon (15ml) fresh lemon juice. It brightens the apple flavor and helps reduce browning while the apples are prepared.
Ground Cinnamon
Use 1½ teaspoons ground cinnamon. Cinnamon provides the main warm spice flavor and complements the natural sweetness of the apples.
Ground Allspice and Nutmeg
Use:
- ¼ teaspoon ground allspice
- ¼ teaspoon ground nutmeg
These spices add additional warmth and depth while allowing the apple flavor to remain noticeable.
Fine Salt
Use ¼ teaspoon fine salt. A small amount of salt balances the sweetness and enhances the overall flavor of the filling.
Pure Vanilla Extract
Use 1 teaspoon (5ml) pure vanilla extract. Vanilla adds depth and rounds out the flavors of the apple filling.
Butter
Use 1½ tablespoons (21g) butter cut into small pieces. The butter is added over the assembled filling before the top crust is placed. It adds richness and helps create a more flavorful filling.
Pie Crust
Prepare 2 homemade pie crusts:
- One crust for the bottom
- One crust for the top
An all-butter pie crust works well for this recipe because it provides a flaky, buttery texture. The dough should be properly chilled before assembly to help maintain the crust structure.
The full pie crust recipe is included in Step 1.
Egg Wash
Use:
- 1 large egg
- 1 tablespoon (15ml) milk
Whisk the egg and milk together, then brush a very thin layer over the bottom crust before adding the filling and a thin layer over the top crust just before baking.
On the bottom crust, the egg wash helps create a moisture barrier. On the top crust, it helps create a golden finish on the baked crust.
Coarse Sugar
Use 1 tablespoon (12g) coarse sugar as an optional topping. Sprinkling it over the egg-washed crust adds a light texture and finishing touch to the pie.
Which Apples Are Best for Apple Pie?
The type of apples you use affects the flavor and texture of the finished pie.
Firm apples are best for baking because they are more likely to hold their shape during cooking. Avoid soft, mealy, or mushy apples because they can break down too much and create an overly soft filling.
A mixture of tart and sweet apple varieties creates a more balanced flavor.
This recipe uses:
- Granny Smith
- Honeycrisp
- Golden Delicious
Granny Smith apples provide tartness that balances the sweetness of the filling. Honeycrisp and Golden Delicious add sweetness and additional apple flavor.
Using multiple varieties creates a deeper filling flavor compared with using only one type of apple.
Golden Delicious is naturally softer than the other varieties, so it is limited to about a quarter of the blend. This helps maintain the intended texture while still adding sweetness and apple flavor.
The selected blend of Granny Smith, Honeycrisp, and Golden Delicious provides the intended balance for this recipe.
Best Pie Crust for Apple Pie
A good pie crust should be sturdy enough to hold a generous amount of apple filling while still staying tender and flaky.
For this apple pie, the crust needs enough structure to support the juicy filling without becoming soggy or falling apart.
A homemade all-butter pie crust works especially well because it provides a rich buttery flavor and flaky texture.
Keeping the dough properly chilled and handling it gently helps create a crust that is easier to work with and bakes more reliably.
The goal is not to make the crust overly complicated. A simple, well-chilled pie dough can create the right balance of a flaky crust and tender apple filling.
A rolling pin is all you need to shape the dough. Whether you are new to making pie crust or experienced with pastry, keeping the dough cold makes an important difference in the final texture.
How to Make Easy Apple Pie
Step 1: Prepare the Pie Crust
Prepare 2 pie crusts using the all-butter pie crust recipe below.
In a large bowl, whisk together the flour, sugar, and salt.
Add the cold butter cubes. Using a pastry cutter, two forks, or your fingertips, cut the butter into the flour until the mixture looks like coarse crumbs with some pea-sized to almond-sized pieces of butter remaining. You can also do this in a food processor by pulsing 8–10 times.
Sprinkle 6 tablespoons (90ml) of ice water over the mixture and mix gently with a fork or spatula. Add more ice water, 1 tablespoon at a time, up to 8 tablespoons (120ml) in total, until the dough just holds together when squeezed. The dough should not feel sticky or wet.
Turn the dough out onto a work surface and gather it together.
Shape the pie dough into two discs, making the bottom disc slightly larger, about 55% of the dough. Wrap each disc in plastic wrap and refrigerate for a minimum of 2 hours before assembling the pie.
Keeping the dough chilled helps maintain the crust structure and makes it easier to handle.
When ready to assemble, place one chilled dough disc on a lightly floured surface. Roll it into a 13–14-inch circle.
Carefully transfer the dough into a 9-inch pie dish that is 1½–2 inches deep. Gently press the dough against the bottom and sides of the dish.
Keep the prepared pie shell refrigerated while preparing the apple filling so the crust stays cold and firm.
Step 2: Prepare the Apple Filling
In a large bowl, combine:
- 100g granulated sugar
- 31g all-purpose flour
- 1½ teaspoons cinnamon
- ¼ teaspoon allspice
- ¼ teaspoon nutmeg
- ¼ teaspoon fine salt
- 15ml lemon juice
- 5ml vanilla extract
Stir until the ingredients are evenly combined.
Add 10 cups (1250g) of prepared apple slices using the recommended blend of Granny Smith, Honeycrisp, and Golden Delicious apples.
Toss gently until the apples are evenly coated with the filling mixture.
Transfer the apple mixture to a large skillet or Dutch oven. Cook over medium heat for approximately 5 minutes, stirring frequently.
This short pre-cooking step allows the apples to soften slightly and helps the spices and juices combine before baking. Do not continue cooking beyond this point.
The apples still need to finish cooking in the oven, and overcooking at this stage can make the filling too soft.
Remove the filling from the heat. Spread it, along with all of its juices, into a shallow rimmed baking sheet or large bowl so it can cool for approximately 20–30 minutes.
Cooling the filling before assembly helps protect the bottom crust from becoming soggy.
Step 3: Assemble the Pie
Remove the chilled bottom crust from the refrigerator.
Prepare the egg wash by whisking:
- 1 large egg
- 1 tablespoon (15ml) milk
Brush a very thin layer of egg wash over the bottom crust. Do not apply a heavy layer.
Spoon the cooled apple filling into the bottom crust along with its juices. Arrange the apples tightly to reduce large air pockets and distribute the filling evenly.
Distribute 1½ tablespoons (21g) of butter cut into small pieces over the apple filling.
Roll the second pie crust dough into a 12-inch circle. Carefully place it over the apple filling.
Fold, seal, and flute the edges. Cut several vents into the top crust to allow steam to escape during baking.
Place the assembled pie in the refrigerator for 20–30 minutes before baking. Cover and refrigerate the remaining egg wash during this time.
This short chilling period helps the crust stay firm and maintain its shape.
Just before baking, brush a thin, even layer of the remaining egg wash over the top crust. Sprinkle 1 tablespoon (12g) coarse sugar over the crust if desired.
Step 4: Bake the Apple Pie
Place the assembled pie on a rimmed baking sheet lined with foil. This helps catch any bubbling juices that may overflow during baking.
Bake the pie on the middle rack of a preheated oven at 400°F (204°C) for 25 minutes.
After the first 25 minutes, reduce the oven temperature to 375°F (190°C).
Continue baking for another 35–45 minutes. The total baking time should be approximately 60–70 minutes.
If the crust edges become too dark before the filling is finished, protect them with a pie crust shield or loosely placed foil.
The pie is ready when:
- The crust is golden brown
- The filling is actively bubbling through the vents
- The apples are tender
For a more precise check, insert a wooden skewer through a vent into the center of the pie to check the apple texture.
An instant-read thermometer should show approximately 200°F (93°C) in the center of the filling.
Step 5: Cool and Serve
Transfer the baked pie to a cooling rack. Allow it to cool for a minimum of 3 hours before slicing.
This cooling period allows the filling to set properly and helps create cleaner slices.
Serve the pie at room temperature or slightly warm. Add vanilla ice cream if desired for a classic apple pie serving option.
Store leftover pie at room temperature for up to 1 day or in the refrigerator for up to 5 days.
How to Know When Apple Pie Is Done
A properly baked apple pie should have a deep golden-brown crust and filling that is actively bubbling through the vents.
These signs together are more reliable than checking the crust color alone.
For a more precise check, use an instant-read thermometer. Insert it through a vent into the center of the filling without touching the bottom crust. The filling should reach approximately 200°F (93°C).
The apples should also be tender when checked through the vent with a wooden skewer.
After baking, allow the pie to cool completely before slicing. Cooling for at least 3 hours allows the filling to set and helps create cleaner slices.
How to Avoid a Soggy Pie Crust
Keep the Bottom Crust Crisp
A soggy bottom crust usually happens when moisture from the filling prevents the pastry from baking properly.
Keeping the dough chilled while preparing the crust helps it stay firm. After forming the bottom crust in the pie dish, keep it chilled while preparing the filling.
The assembled pie should also be chilled before baking. This helps protect the crust from excess moisture.
A very thin layer of egg wash brushed on the bottom crust before adding the filling also helps create a moisture barrier.
The recipe allows either a glass pie dish or metal pie dish. Use the option available to you while maintaining the correct baking process.
Start With the Right Heat
Preheat the oven to 400°F (204°C) before baking. Place the pie on a rimmed baking sheet lined with foil to catch any bubbling juices.
Bake at 400°F for the first 25 minutes.
Then reduce the temperature to 375°F (190°C) and continue baking until the crust is deeply golden and the filling is actively bubbling.
If the bottom crust remains pale or soft, future baking can benefit from additional bottom heat by using a preheated baking sheet or moving the pie to the lower-third rack.
Let the Filling Finish Setting
Do not slice the pie immediately after baking.
The filling needs time to set properly. Let the pie cool for at least 3 hours before cutting.
This allows the apple filling to thicken and helps the flaky crust maintain its structure instead of becoming soft underneath.
Storage
For make-ahead preparation, pie crust dough can be prepared ahead of time. Store the dough in the refrigerator for up to 5 days or in the freezer for up to 3 months.
If preparing the finished apple pie 1 day ahead, allow it to cool completely. Cover it loosely with foil and keep it at room temperature in a cool place.
A baked pie can also be frozen for up to 3 months. Allow it to cool completely and wrap it tightly before freezing.
When ready to serve, thaw it overnight in the refrigerator and bring it to room temperature before serving.
For short-term storage, a completely cooled pie can remain loosely covered at room temperature for up to 1 day.
If keeping it longer, store it tightly covered in the refrigerator for up to 5 days.
Reheating Instructions
To reheat an individual slice, place it in a 325°F (163°C) oven for about 15–20 minutes or until warmed through.
Gentle reheating helps warm the filling, though the crust may be slightly less crisp than on a freshly baked pie.
Tips for the Best Apple Pie
Use enough apples to properly fill the pie crust because the slices soften and settle slightly during baking.
Cut the apples into uniform ¼-inch slices so they cook evenly. Consistent slices help prevent some pieces from becoming too soft while others remain firm.
Choose a pie dish that is 1½–2 inches deep. This recipe is designed for a 9-inch deep-dish pie, which provides enough space for the apple filling.
A glass pie dish or metal pie dish can both be used depending on what you have available.
Arrange the apples tightly inside the crust. This helps reduce large air pockets and allows the filling to distribute more evenly.
Place the top crust over the apples, join it with the bottom crust, and seal the edges. Crimp or flute the edges to help hold the filling inside.
Cut vents into the top crust so steam can escape during baking.
Notes
For the best texture, use firm apples that hold their shape during baking.
The recommended combination of Granny Smith, Honeycrisp, and Golden Delicious provides a balance of tartness, sweetness, and layered apple flavor.
Prepare the apples in consistent ¼-inch slices so they soften evenly without becoming mushy.
The short pre-cooking step helps the apples begin softening while allowing them to maintain structure during baking.
Use two homemade pie crusts for this recipe:
- One bottom crust
- One top crust
Keep the dough properly chilled before working with it.
Roll the bottom dough disc into an approximately 13–14-inch circle and fit it carefully into the 9-inch pie dish. Keep the prepared bottom crust chilled while finishing the filling. Just before filling, brush it with a very thin layer of egg wash.
Once the apple filling has cooled, spoon it into the crust along with its juices. Arrange the apples tightly to distribute the filling evenly.
Add small pieces of butter over the filling before adding the top crust. Roll the second chilled dough disc into an approximately 12-inch circle.
Place it over the filling, trim excess dough, seal the edges, and cut vents in the top so steam can escape.
Refrigerate the assembled pie for 20–30 minutes before baking. Brush the top crust with egg wash and add coarse sugar if desired.
Bake at 400°F (204°C) for 25 minutes, then reduce the temperature to 375°F (190°C). Continue baking for 35–45 minutes.
The pie is ready when the filling is actively bubbling and reaches about 200°F (93°C).
Allow the pie to cool for at least 3 hours before slicing. This helps the filling set properly and creates cleaner slices.
Nutrition Information
The nutrition values below are approximate. They are calculated for the complete pie, including the all-butter pie crust, apple filling, butter, and egg wash, and are based on the pie being cut into 8 slices.
Each slice, or 1/8 of the pie, provides approximately:
- 525 kcal
- 69g carbohydrates
- 6g protein
- 26.5g total fat
- 4.9g fiber
- 29g sugar
Actual nutrition will vary depending on the brands of ingredients used and how the pie is sliced. If the pie is cut into 10 slices, each slice will be about 20% smaller.
Frequently Asked Questions
How Do You Make Apple Pie So the Bottom Crust Isn’t Soggy?
A soggy bottom crust is usually related to moisture and baking time.
For this recipe, you do not need to pre-bake the bottom crust because the pie has enough baking time for both the crust and filling to cook properly.
Keeping the dough chilled, cooling the filling before assembly, and allowing the pie to bake fully helps protect the bottom crust.
If the crust remains pale or soft, the pie may need additional baking time.
Should You Cook the Apples Before Baking Apple Pie?
You do not have to cook the apples first, but this recipe uses a short pre-cooking method.
Cooking the filling for 5 minutes helps soften the apples slightly and allows the spices and juices to combine.
The important part is not to cook the apples too long. They still need to finish cooking in the oven, and keeping the pre-cook time short helps prevent a mushy filling.
What If I Don’t Want to Make Pie Crust?
If making traditional pie crust feels difficult, there are other ways to enjoy similar apple flavors.
Options such as apple pie bars, apple cheesecake pie, classic apple crisp, and baked apples provide easier alternatives.
If you want a traditional pie, the extra preparation creates the flaky crust and tender filling that define this dessert.
What Apples Are Best for Apple Pie?
Firm apples work best because they hold their shape during baking.
This recipe uses Granny Smith, Honeycrisp, and Golden Delicious together to create a balance of tartness, sweetness, and apple flavor.
Using more than one apple variety creates a fuller filling flavor than relying on a single type.
Do I Have to Peel My Apples?
Peeling the apples is recommended for this recipe.
Apple skins can become tougher during baking and may affect the texture of the finished filling. Removing the skins helps create a smoother apple pie filling.
Why Is My Apple Pie Filling Runny?
Common reasons for a runny filling include slicing the pie before it has cooled enough, underbaking, or removing the pie before the filling is actively bubbling.
The pie needs at least 3 hours of cooling time so the filling can properly set.
Cutting the pie too early can cause the filling to remain loose. Allowing the pie to cool completely helps create cleaner slices and a thicker filling texture.
Pinterest Pins