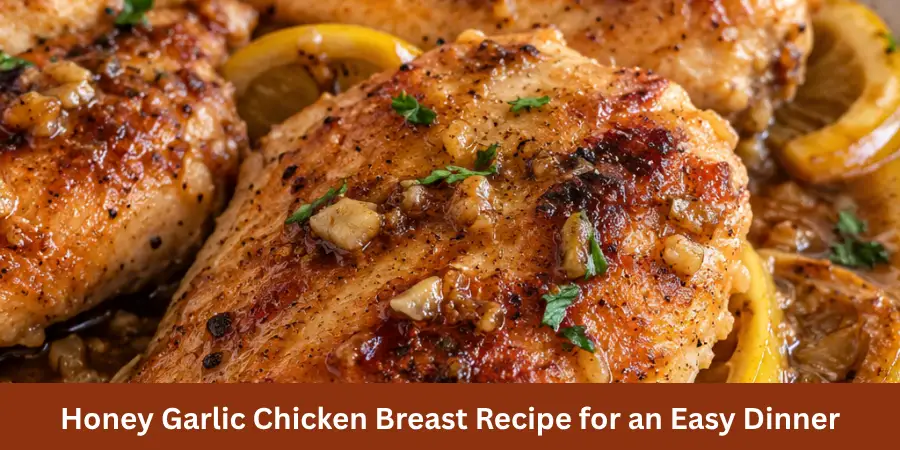
This Honey Garlic Chicken Breast is a simple skillet dinner that builds a lot of flavor from a few everyday ingredients.
The chicken breast is seared in olive oil until golden and tender, then coated in a honey garlic sauce made with sweet honey, savory garlic, soy sauce, and a touch of acidity.
The result is juicy chicken with a glossy glaze that adds plenty of flavor without making the dish overly sweet. This recipe is an easy variation of classic pan-seared chicken dishes.
Honey Garlic Chicken Breast-The Short Answer
After the chicken develops a lightly browned exterior, it finishes cooking in the warm honey sauce so the glaze can cling to the surface.
The combination of honey, garlic, soy sauce, and acidity creates the sweet and savory balance often found in restaurant-style flavors. One reason this recipe works well for busy dinners is the simple cooking process.
The chicken is prepared in one skillet, and the sauce comes together while the chicken rests.
The entire recipe takes about 25–30 minutes, making it practical when you want a flavorful homemade meal without a complicated process.
The honey garlic sauce creates a smooth coating that stays with the chicken instead of becoming a thin liquid.
Honey provides sweetness, garlic adds savory flavor, soy sauce brings depth, and acidity helps balance the richness of the sauce. This chicken pairs well with many side dishes.
Serve it with mashed sweet potatoes, roasted broccoli, rice, quinoa, or a simple salad. The extra sauce can soak into grains and vegetables while adding contrast to lighter sides.
Why You’ll Love This Recipe
What makes this Honey Garlic Chicken Breast special is how simple ingredients create a flavorful dinner.
The sauce combines honey, low-sodium soy sauce, chicken broth, apple cider vinegar, fresh garlic, and a small amount of cornstarch to create a smooth, glossy finish.
The cornstarch slurry helps thicken the sauce without making it heavy.
The vinegar balances the sweetness, while fresh garlic provides the bold flavor expected from a honey garlic sauce. The chicken is seasoned and seared in a skillet before being finished in the sauce.
This method allows the browned bits left in the skillet to add extra flavor while helping the sauce develop a richer taste. Another benefit of this recipe is how practical it is for regular meals.
The ingredients are simple and mostly pantry-friendly, while the sauce adds enough flavor to make the chicken feel special.
Once the sauce reaches the right consistency, it coats each chicken breast with a glossy layer instead of running off like a thin broth.
This creates a finished dish that looks polished while keeping the preparation straightforward.
About the Recipe
This Honey Garlic Chicken Breast recipe is designed around a simple skillet method.
The chicken is seared first, then finished in a honey garlic sauce made with honey, soy sauce, garlic, broth, and acidity.
The sauce creates the signature flavor of the dish by combining sweet, savory, and tangy elements.
Fresh garlic provides the main aromatic flavor, while honey gives the sauce its sweetness and glossy appearance. This recipe is also practical for meal preparation.
Cooked chicken and sauce can be stored in an airtight container in the refrigerator for up to 4 days. The recipe takes approximately 25–30 minutes from start to finish. It makes 4 servings, with one chicken breast per serving.
For reheating, the chicken can be warmed gently with a small amount of water or chicken broth to help keep the sauce smooth and prevent the chicken from drying out.
Ingredients Needed
4 boneless, skinless chicken breasts (6 oz / 170g each)
¼ cup (85g) honey
¼ cup (60ml) low-sodium soy sauce
4 large garlic cloves, minced (12g)
1 tablespoon light olive oil (15ml)
¼ cup chicken broth (60ml)
1 tablespoon cornstarch (8g)
2 tablespoons cold water (30ml)
½ teaspoon fine salt (3g)
½ teaspoon ground black pepper (1g)
1 teaspoon lemon-pepper seasoning (3g)
1 tablespoon apple cider vinegar (15ml)
¼ teaspoon red pepper flakes (0.5g), optional
1 tablespoon chopped fresh parsley (4g), optional
1 tablespoon sliced green onions (6g), optional
1 teaspoon sesame seeds (3g), optional
Ingredients Notes
Chicken Breast
Use 4 boneless, skinless chicken breasts weighing about 6 oz (170g) each.
Chicken breast is the main protein in this recipe and works well with the honey garlic sauce because it absorbs the glaze while staying tender when cooked properly.
If the chicken breasts are thick or uneven, gently pound them to an even thickness. This helps the chicken cook more evenly.
Larger chicken breasts can also be sliced horizontally into thinner cutlets. Boneless chicken thighs can be used as an alternative.
They provide a slightly richer flavor because they contain more fat, but the cooking process remains similar.
Honey
Use ¼ cup (85g) honey. Honey provides the main sweetness in the sauce and helps create the glossy coating that clings to the chicken.
It balances the savory ingredients while giving the dish its signature honey garlic flavor. Maple syrup can replace honey using approximately 80–85g.
The flavor will be slightly less honey-forward, and the sauce may have a slightly different consistency.
Low-Sodium Soy Sauce
Use ¼ cup (60ml) low-sodium soy sauce. Soy sauce adds savory depth and balances the sweetness of the honey.
Low-sodium soy sauce helps control the overall salt level of the finished dish. Regular soy sauce or coconut aminos can be used as alternatives.
Coconut aminos are naturally sweeter and less salty, so taste the finished sauce before adding additional salt.
Fresh Garlic
Use 4 large garlic cloves, minced (12g). Fresh garlic provides the main garlic flavor and gives the sauce its bold savory character.
Fresh cloves provide the strongest flavor.
Fresh ginger can also be added as a flavor variation. It provides additional warmth without changing the main honey garlic sauce structure.
Olive Oil
Use 1 tablespoon light (regular) olive oil (15ml). Olive oil is used for the skillet searing stage and helps create the browned exterior on the chicken.
Light olive oil works well for higher heat cooking. Avocado oil can also be used.
Extra-virgin olive oil is not preferred for the high-heat skillet stage because of its stronger flavor and lower smoke point.
Chicken Broth
Use ¼ cup (60ml) chicken broth. Chicken broth helps keep the sauce fluid and creates the right consistency while the chicken finishes cooking.
Cornstarch
Use 1 tablespoon (8g) cornstarch mixed with 2 tablespoons cold water (30ml). This creates a slurry that thickens the sauce and gives it a smooth, glossy finish.
The cornstarch helps the sauce coat the chicken without making it heavy.
Seasonings
Use:
• ½ teaspoon fine salt (3g)
• ½ teaspoon ground black pepper (1g)
• 1 teaspoon lemon-pepper seasoning (3g)
These seasonings enhance the chicken and balance the sweetness of the honey sauce.
Lemon-pepper seasoning adds brightness while salt and pepper provide the basic seasoning foundation.
Apple Cider Vinegar
Use 1 tablespoon (15ml) apple cider vinegar. The acidity balances the sweetness of the honey and adds brightness to the sauce.
Fresh lemon juice can be used as an alternative, using 1 tablespoon (15ml).
Red Pepper Flakes
Use ¼ teaspoon (0.5g) red pepper flakes, if using. They add a subtle amount of heat without overpowering the sweet and savory flavors. Increase to ½ teaspoon for a spicier variation.
Garnishes
Finish the chicken with these optional garnishes:
• 1 tablespoon chopped fresh parsley (4g)
• 1 tablespoon sliced green onions (6g)
• 1 teaspoon sesame seeds (3g)
These garnishes add freshness, color, and texture while complementing the honey, soy, and garlic flavors.
How to Make Honey Garlic Chicken Breast
Step 1: Prepare and Season the Chicken
Pat the 4 chicken breasts dry with paper towels. If the chicken pieces are unevenly thick, gently pound the thicker areas until they reach about ¾ inch thickness.
Do not pound them extremely thin because they can overcook quickly. This helps the chicken cook more evenly throughout.
Season both sides of the chicken with:
Fine salt
Ground black pepper
Lemon-pepper seasoning
Make sure the seasoning is distributed evenly over the chicken before cooking.
Before heating the skillet, prepare the sauce mixture. In a small bowl, whisk together the honey, low-sodium soy sauce, chicken broth, apple cider vinegar, and red pepper flakes (if using) for 20–30 seconds, until no honey streaks remain.
Mince the garlic and keep the garlic, the sauce mixture, and the cornstarch and cold water within reach, because the garlic stage lasts only 30–45 seconds.
Step 2: Sear the Chicken
Heat 1 tablespoon (15ml) light olive oil in a heavy 12-inch skillet over medium-high heat. Place the chicken breasts in the skillet in a single layer.
A 12-inch skillet fits all 4 chicken breasts without touching. If you are using a 10-inch skillet, cook the chicken in 2 batches of 2 breasts, dividing the 15ml oil between the batches, and loosely tent the first batch with foil while the second batch cooks. Cooking in 2 batches adds approximately 9–12 minutes.
Avoid moving the chicken repeatedly so it can develop a lightly browned exterior. Cook the first side for 5–6 minutes.
Flip the chicken and cook the second side for another 4–6 minutes. Start checking the temperature after about 3 minutes on the second side.
Check the thickest part of the chicken with an instant-read thermometer.
Remove the chicken when it reaches 160°F (71°C). The chicken will finish cooking to 165°F (74°C) in the sauce. Transfer the chicken to a plate.
Loosely cover it with foil and let it rest while preparing the sauce. This helps keep the chicken warm while the honey garlic glaze comes together.
Step 3: Prepare the Honey Garlic Sauce
Reduce the skillet heat to medium-low. If the skillet is extremely hot, let it cool for about 30 seconds. Add the minced garlic to the same skillet.
Cook for 30–45 seconds, stirring continuously, until the garlic becomes fragrant. Avoid browning the garlic because it can create a bitter flavor.
Add the prepared sauce mixture:
• Honey
• Low-sodium soy sauce
• Chicken broth
• Apple cider vinegar
• Red pepper flakes
Scrape the browned bits from the bottom of the skillet while stirring. These browned pieces add extra flavor to the sauce.
Bring the mixture to a gentle simmer. Cook for 1–2 minutes until the ingredients begin to combine.
Step 4: Thicken the Sauce
In a small bowl, whisk the cornstarch with cold water to create a smooth slurry. Make sure there are no lumps before adding it to the sauce.
Slowly pour the slurry into the simmering sauce while whisking continuously. Continue cooking for another 1–2 minutes.
The sauce should become glossy and thick enough to coat the back of a spoon while still remaining pourable.
Step 5: Finish Cooking the Chicken in the Sauce
Return the chicken breasts to the skillet along with any juices collected on the plate. Spoon the honey garlic sauce over the chicken.
Allow the chicken to simmer gently in the sauce for 1–3 minutes. Turn the chicken once if needed so each piece is evenly coated.
Check the thickest part of the chicken again. The final temperature should reach at least 165°F (74°C). If it is below 165°F, continue simmering gently in 30-second increments, checking after each interval.
If the sauce becomes too thick, add 1 tablespoon of chicken broth or water over low heat to loosen it.
Avoid aggressively boiling the sauce during this final stage so the chicken stays tender.
Step 6: Serve the Chicken
Remove the skillet from the heat. Serve the honey garlic chicken immediately.
Finish with:
• Chopped fresh parsley
• Sliced green onions
• Sesame seeds
These toppings add freshness, color, and texture to the finished dish. The final sauce should cling to the chicken while remaining glossy and easy to serve.
Easy Ways to Change the Recipe (Variations)
This Honey Garlic Chicken Breast recipe can be adjusted while keeping the same sweet and savory flavor balance.
Small changes in the protein, seasoning, or sauce ingredients can create different versions without changing the basic cooking method.
Use Chicken Thighs Instead of Chicken Breast
Boneless, skinless chicken thighs are an easy alternative to chicken breast.
Use 4 chicken thighs of similar size and skip the pounding step. Chicken thighs contain more fat than chicken breast, which creates a slightly richer flavor.
Cook thighs for approximately 5–7 minutes per side, depending on thickness, and follow the same 160°F (71°C) searing and 165°F (74°C) final temperature targets. The cooking time can vary, so check the internal temperature instead of relying only on the clock.
Add More Heat
For a spicier version, increase the amount of red pepper flakes. The original recipe uses ¼ teaspoon, but it can be increased to ½ teaspoon for more heat.
Freshly grated ginger can also be added as a flavor variation. Add 1 teaspoon during the garlic cooking stage to bring additional warmth to the sauce.
Use Maple Syrup Instead of Honey
Maple syrup can replace honey if desired. The flavor will be slightly different because it will be less honey-forward.
The sauce may also be slightly thinner compared with using honey.
Use Coconut Aminos Instead of Soy Sauce
Coconut aminos can replace soy sauce as another option. It provides a similar savory element but is naturally sweeter and less salty.
Taste the finished sauce before adding extra salt because the seasoning balance may change.
Adjust the Finishing Ingredients
The garnishes can be adjusted based on preference. Increase the sesame seeds for a stronger toasted flavor.
Roasted broccoli also pairs well with the sweet honey garlic sauce.
These small changes allow you to adjust the flavor and texture while keeping the same cooking method.
Storage
Allow the cooked chicken to cool slightly before storing leftovers. Place the chicken and sauce in an airtight container.
Store in the refrigerator for up to 4 days. Keep the leftovers chilled until ready to reheat.
For longer storage, cool the chicken and sauce completely, then freeze them in a freezer-safe airtight container for up to 3 months. Thaw overnight in the refrigerator before reheating.
Reheating Instructions
Place the chicken and sauce in a skillet over low to medium-low heat.
Add 1 tablespoon (15ml) water or chicken broth. Cover loosely and heat until warmed through.
If the sauce has thickened in the refrigerator, add another tablespoon of liquid as needed to loosen the sauce. If the chicken was frozen, add 1–2 tablespoons of water or chicken broth while reheating.
Gentle reheating helps keep the chicken tender and prevents the sauce from becoming too thick.
Tips for Best Results
Prepare the Sauce Properly
Whisk the honey with the low-sodium soy sauce and remaining sauce ingredients before adding it to the skillet.
This helps the ingredients combine evenly. Avoid adding extra salt before tasting the finished sauce.
Soy sauce already contributes savory flavor, and low-sodium options help keep the balance controlled.
Use fresh garlic for the strongest flavor. Fresh garlic provides the bold garlic taste that defines this recipe.
Avoid Excessive Heat
Avoid using very high heat, especially once honey is added to the skillet. Honey can burn quickly when exposed to excessive heat.
Sear the chicken first, then finish it gently in the sauce. This creates a flavorful browned exterior while keeping the chicken tender.
Prepare Ahead Carefully
The honey-soy mixture can be prepared up to 24 hours in advance. Keep it covered and refrigerated until ready to use.
The sauce is prepared separately and added after the chicken is seared, so there is no raw chicken marinade to reuse or discard.
Make a Smooth Sauce
Mix cornstarch with cold water to create a slurry before adding it to the sauce. Whisk the slurry again before adding it so it blends evenly.
Adding the slurry properly helps prevent lumps and creates a smooth glossy sauce that coats the chicken.
Notes
For the best results, prepare the chicken breasts so they have an even thickness.
If the chicken pieces are thick or uneven, gently pound them before cooking so they cook more evenly. Fresh garlic provides the strongest flavor for the honey garlic sauce.
Using low-sodium soy sauce helps maintain a balanced savory flavor without making the sauce overly salty. Chicken thighs can also be used instead of chicken breast.
They provide a slightly richer flavor because of their higher fat content while still working well with the same sauce.
Cornstarch helps create a thicker sauce with a smooth, glossy consistency. Mix it with cold water first to create a slurry before adding it to the simmering sauce.
If you prefer some heat, increase the red pepper flakes according to your preference. The amount can be adjusted while keeping the sweet and savory balance of the sauce.
Serve the chicken with:
• White rice
• Brown rice
• Quinoa
• Cauliflower rice
Choose the side that best fits your meal preference.
For serving, pair the chicken with rice, quinoa, sweet potatoes, or your favorite vegetables. The extra sauce works well with these sides and helps complete the meal.
Store leftovers in an airtight container in the refrigerator for up to 4 days. Reheat gently to help prevent the chicken from drying out.
You can warm the chicken in a skillet over low to medium-low heat or use the microwave on medium until heated through.
Adding a small amount of water or chicken broth during reheating can help loosen the sauce if it becomes too thick.
Nutrition Information
The nutrition values are calculated per serving. Each serving includes one chicken breast, sauce, and the listed garnish.
One serving contains approximately:
• 325 kcal
• 21.5 g carbohydrates
• 40.0 g protein
• 8.3 g total fat
• 1.8 g saturated fat
• 0.6 g fiber
• 18.0 g sugar
• 1,100 mg sodium
• 135 mg cholesterol
These figures are calculated estimates based on the specified ingredients and quantities.
The actual nutrition may vary depending on the brands of chicken, soy sauce, broth, honey, and other ingredients used.
Frequently Asked Questions
What Is the Best Way to Cook Chicken Breast for This Recipe?
Cook the chicken breast in a skillet with a small amount of olive oil. Sear it until lightly browned, then finish it gently in the honey garlic sauce. The chicken should reach a final internal temperature of 165°F (74°C).
Can I Use Chicken Thighs Instead of Chicken Breast?
Yes. Boneless, skinless chicken thighs work well as an alternative.
Their cooking time can vary depending on thickness, so use an instant-read thermometer to check the thickest part.
What Temperature Should Chicken Breast Be Cooked To?
The final temperature should reach 165°F (74°C). Check the thickest part of the chicken with an instant-read thermometer to confirm it is fully cooked.
Can I Use Maple Syrup Instead of Honey?
Yes. Maple syrup can be used as a substitute for honey. The sauce will have a slightly different flavor and may be a little thinner.
Can I Use Cornstarch to Thicken the Sauce?
Yes. Cornstarch is used to thicken the sauce and create a smooth, glossy consistency.
If the sauce needs more thickening, whisk together ½ teaspoon cornstarch and 1 teaspoon cold water, stir a small amount into the simmering sauce, and cook for 30–60 seconds. Add a smaller amount at a time rather than adding too much at once.
Can I Marinate the Chicken Before Cooking?
This recipe does not use the sauce as a chicken marinade. The honey-soy sauce is prepared separately and added to the skillet after the chicken is seared.
Keeping the sauce separate means there is no raw chicken marinade to reuse or discard.
Pinterest Pins